Hello friends,
Due to requests and due to the fact that it took me forever to find some camera settings that I was happy with, I am not necessarily creating a guide however I am sharing the way I set up my camera and the assets that I use for said settings in hopes that it will help you as well.
That being said let’s jump right into it.
NOTE: All settings are done for the Logitech C922 pro, it can be applied universally but obviously you’ll need to find your preferred sweet spot.
After we open up OBS we go into the camera properties and open up ‘configure video’
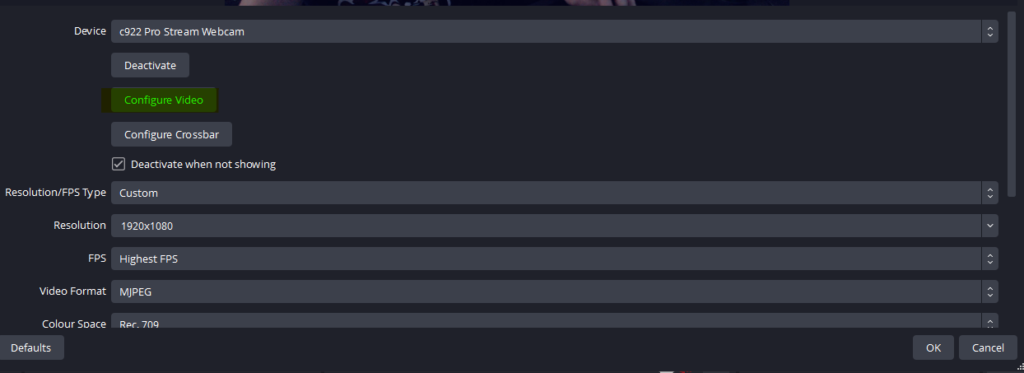
We will be prompted with the following menu:
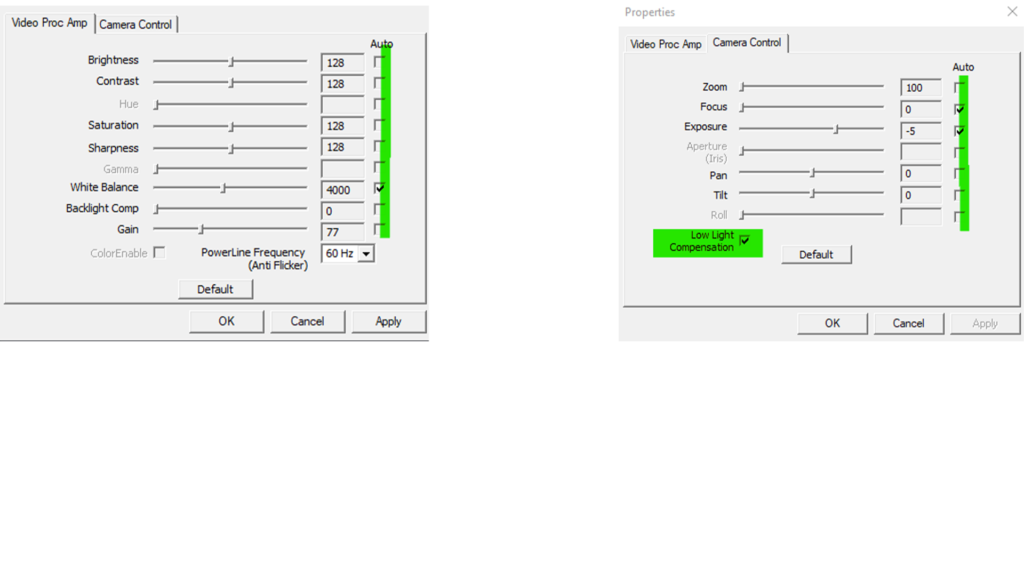
All you have to do here is UNCHECK everything that is highlighted in green, that means no white balance, no Focus, no Exposure and no Low Light Compensation.
Once you disabled all of those, from the ‘Video Proc Amp’ set the gain all the way down to 0 then hit apply and ok.
After you do that, you’ll be seeing the camera properties again.
You’ll need to click on the ‘FPS’ dropdown and select ‘Match Output FPS’ then without taking any other action, open the dropdown again and select ‘Highest FPS’ from the dropdown.
The reason for this is there’s some kind of glitch that doesn’t apply the fps quality if left as is. (IMPORTANT: You will need to do these steps EVERY single time you open up OBS)
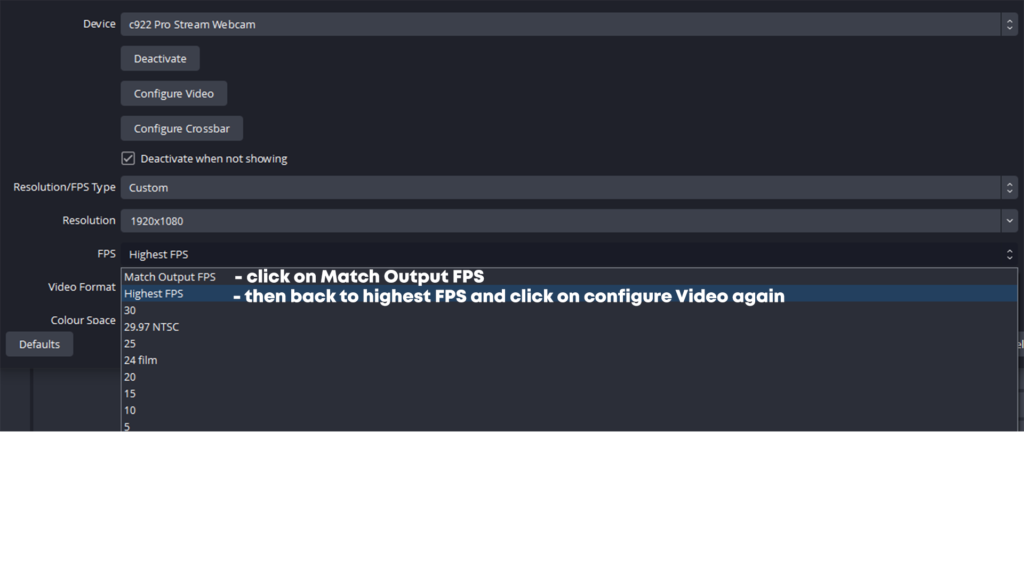
After selecting ‘Highest FPS’ again from the dropdown we will open ‘Configure Video’ once more and select the final values. I’ll leave you guys with the settings I use however it may not work the same for everyone as the lighting you use varies from setup to setup (as an example I only have one ring light for now which is not ideal, so I’ll probably change my settings again when I get more lights.)
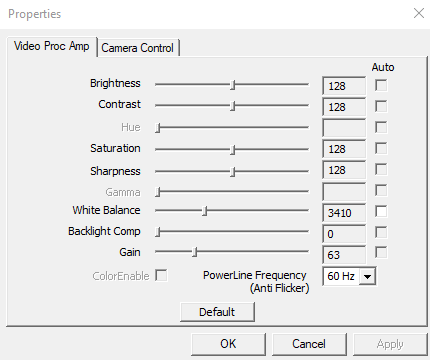
So this is what I’m currently using, I constantly have a look at the camera when I play with the sliders, it’s never the same values, however so you can get a feel, I never go above 68 gain and below 3300 white balance.
The way you can distinguish what a good value would be for white balance is to slide down until you’re webcam doesn’t look natural anymore, everything looks like a pale blue, then gradually slide it up to the point where it transitions from blue to normal color, that’s my sweet spot.
The gain like I said, I usually keep it between 60 and 68 depends how bright you like the image.
Now, on to the final part we will be looking at LUTs. For those of you that are curious, a LUT is a tool that lets filmmakers, editors, and colorists save particular color grades as a template. Think of a LUT as a color preset that a filmmaker can readily turn to when working on a project.
I will be preparing some of the ones I use for you to download at the end of the post or you can make your own just the way you like them.
To apply a LUT to your webcam in OBS you will need to right click your camera, select ‘filters’ and you will be adding a new filter, from the list you will select ‘Apply LUT’ after applying LUT you click on it to open a path towards the file, you select the intensity from the slider and… you guessed it, we’re done 🙂
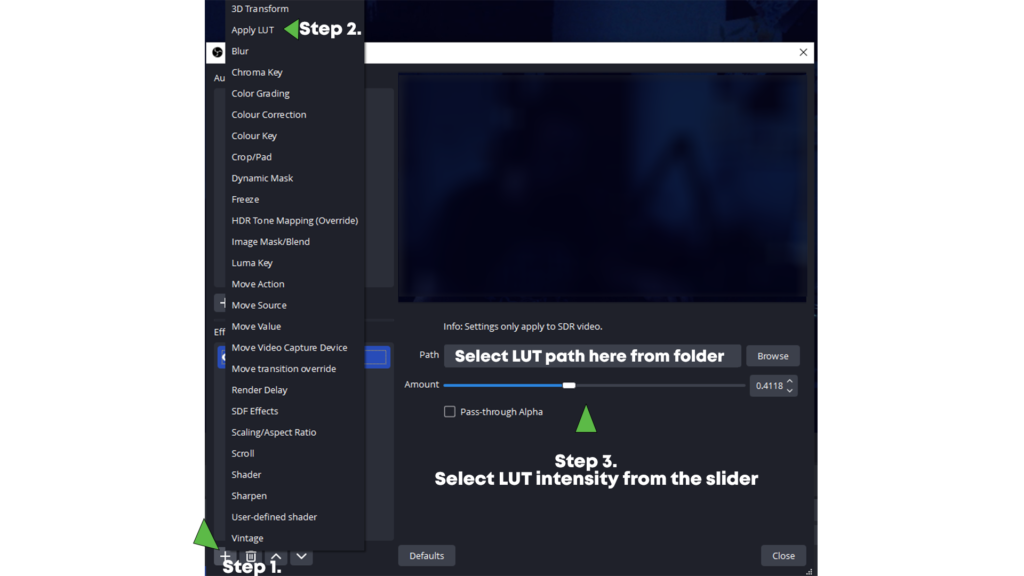
REMINDER: You will need to repeat the steps for gain / white balance / focus/ low light compensation / unticks and values plus FPS change from dropdown every single time you open OBS. I know it’s a bother at first but I promise you after you do it a few times it will become second nature and it is super worth it.
As promised, you can get the LUTs I’m using by clicking on the ‘DOWNLOAD’ button below.
If I helped you in any way please leave a comment with your thoughts. It helps me knowing people actually get value out of these posts and motivates me to keep giving you guys more of them.
Stay safe!
